Pics of your reloading area
Moderators: carlson1, Charles L. Cotton
-
Topic author - Member
- Posts in topic: 3
- Posts: 81
- Joined: Sat Jul 28, 2007 12:54 pm
- Location: Helotes
Pics of your reloading area
Trying to decide where to set up my reloading equipment, it looks like I am going to be relegated to the garage. I have seen a pic of LT's bench, but would love to see some more workbench setups.
Thanks,
Skip
Thanks,
Skip
-
Topic author - Member
- Posts in topic: 3
- Posts: 81
- Joined: Sat Jul 28, 2007 12:54 pm
- Location: Helotes
Re: Pics of your reloading area
That's ok, I am just looking for ideas on how and where people set there equipment, on the bench. Organizational ideas and stuff. But thanks for replying Andy...AndyC wrote:Ohhhhhhh, you don't want to see mine, mate - I've been banished to the shed
-
- Senior Member
- Posts in topic: 3
- Posts: 406
- Joined: Sat Jul 22, 2006 6:30 pm
- Location: DFW-Area
Re: Pics of your reloading area
I'll try to post pics in the AM. Mine is in an armore I built. It is VERY sturdy and weighs several hundred pounds. It was in our Master Bedroom in the previous house, now it's in my office. It took me a couple of months and a lot of $$$ to build, but it worked out well. Just an idea if you want to contest the "banishment". Good night.
NRA Life Member
"The beauty of the second amendment is that it will not be needed until they try to take it." -- Thomas Jefferson
-
- Senior Member
- Posts in topic: 3
- Posts: 406
- Joined: Sat Jul 22, 2006 6:30 pm
- Location: DFW-Area
Re: Pics of your reloading area
This is the reloading bench/cabinet I built several years ago. It works very well. While somewhat plain in styling, it is at least not ugly. I always meant to top it off with some crown molding or some kind of hardwood trim, but I just never got around to it.
This is the exterior, doors closed
This is the interior, both upper section and lower section lights are switched on
Upper section
Lower section
Lower section, details of leg/surface support
Upper section, details, storage shelf support
IIRC, some of the construction details.
• Built from 3 sheets of ¾ in particle board. This allowed me to put in all the screw holes I wanted without concern as they were easily covered during finishing
• Used 3 or 4 2x4 for the framing. The legs are doubled, glued, and screwed, one is 3.5 in shorter to form a rabbit to support the work surface frame, wood-on-wood
• Work surface is laminated from ¾ and ½ marine plywood (very hard wood) as it is something I had on hand. It’s covered in a maple finish Formica.
• About 3 pounds of screws were used in the construction. I wanted everything heavily glued and screwed into place.
• Double wheeled locking casters allow it to be moved, but it still isn’t easy as it weighs several hundred pounds
• Outlet strip provides power to external open section for a TV, there is also an antenna jack wall plate up there to allow connection to antenna/cable.
• Interior finish is epoxy paint
• Exterior finish is Formica in… wait a minute… wait for it… Winchester Walnut
• Upper section shelves are adjustable via brackets
• Lower section shelves are fixed.
Hope this gives you another idea.
NRA Life Member
"The beauty of the second amendment is that it will not be needed until they try to take it." -- Thomas Jefferson
-
- Senior Member
- Posts in topic: 3
- Posts: 569
- Joined: Tue Jul 10, 2007 5:03 pm
- Location: Rowlett, Tx
Re: Pics of your reloading area
Made mine from the wife's old student desk (with her permission of course). Some 2x4 reinforcement for the legs, a new 1"thick top, and some additional shelving for powder scale and storage and I have a loading bench. Drawers are convenient for tools, storage boxes, cleaning supplies etc.
Just remember to make it sturdy, have sufficient lighting, and more room is always nice.
Good luck on your project.
Just remember to make it sturdy, have sufficient lighting, and more room is always nice.
Good luck on your project.
"Limit politicians to two terms. One in office and one in jail!" (Borrowed from an anonymous donor)
-
- Site Admin
- Posts in topic: 4
- Posts: 17787
- Joined: Wed Dec 22, 2004 9:31 pm
- Location: Friendswood, TX
- Contact:
Re: Pics of your reloading area
Here's my reloading area in an upstairs bedroom.
This is a front view of the reloading bench. The only change is the Dillion 550
was replaced with another Dillon 650. Note the special bracket to put the fluorescent
light directly over the bench and presses. You can't have too much light!
This photo shows how added support and rigidity was added to the leading edge of the bench to prevent flexing when using the press.
A 2X10 was added across the full width of the leading edge of the bench so the press sits over and bolts to this area.
This photo shows the bench power panel. It's very convenient being able to turn off everything with one switch.
This photo shows the tracks for the adjustable shelves on top of the bench.
Chas.
-
- Senior Member
- Posts in topic: 1
- Posts: 362
- Joined: Thu Mar 30, 2006 1:37 pm
- Location: Houston, TX
Re: Pics of your reloading area
I have a XL650, Redding T7 and a Rockchucker mounted on one 48x24 bench. The desk is used mainly for cleaning handguns. There are 2 storage cabinets and a safe on the opposite walls. The lamp in the corner was replaced last year with a new 5 bulb lamp. At my age it is impossible to have too much light.
-
Topic author - Member
- Posts in topic: 3
- Posts: 81
- Joined: Sat Jul 28, 2007 12:54 pm
- Location: Helotes
Re: Pics of your reloading area
Thanks guy's, I am starting to get some ideas running through my head. Although, I don't think it will end up NEAR as nice as the one's here so far...
-
- Site Admin
- Posts in topic: 4
- Posts: 17787
- Joined: Wed Dec 22, 2004 9:31 pm
- Location: Friendswood, TX
- Contact:
Re: Pics of your reloading area
Be sure to build a very sturdy bench! That's the foundation for everything else.skip wrote:Thanks guy's, I am starting to get some ideas running through my head. Although, I don't think it will end up NEAR as nice as the one's here so far...
Chas.
-
- Senior Member
- Posts in topic: 2
- Posts: 1487
- Joined: Mon Feb 16, 2009 7:47 pm
- Location: Sugar Land, Texas
Re: Pics of your reloading area
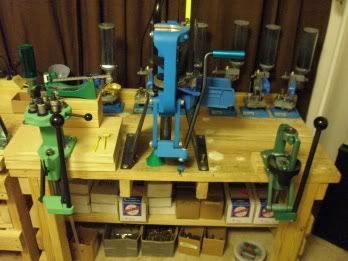
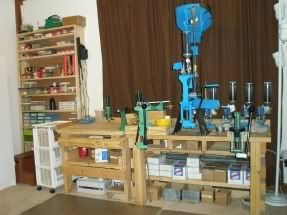
Just getting things set up, but here's what I've got:
http://www.GeeksFirearms.com NFA dealer.
$25 Transfers in the Sugar Land, Richmond/Rosenburg areas, every 25th transfer I process is free
Active Military, Veterans, Law Enforcement, Fire, EMS receive $15 transfers.
NRA Patron Member, NRA Certified Pistol Instructor, NRA Certified CRSO, Tx LTC Instructor
$25 Transfers in the Sugar Land, Richmond/Rosenburg areas, every 25th transfer I process is free
Active Military, Veterans, Law Enforcement, Fire, EMS receive $15 transfers.
NRA Patron Member, NRA Certified Pistol Instructor, NRA Certified CRSO, Tx LTC Instructor
-
- Senior Member
- Posts in topic: 3
- Posts: 569
- Joined: Tue Jul 10, 2007 5:03 pm
- Location: Rowlett, Tx
Re: Pics of your reloading area
PBratton wrote:Just getting things set up, but here's what I've got:
Plenty of room, plenty of sturdy! Looks like a ton of potential.
Shelves over the bench would make a nice place for some lighting and as things heat up this summer, you've got cold cokes handy!
"Limit politicians to two terms. One in office and one in jail!" (Borrowed from an anonymous donor)
-
- Senior Member
- Posts in topic: 3
- Posts: 406
- Joined: Sat Jul 22, 2006 6:30 pm
- Location: DFW-Area
Re: Pics of your reloading area
I was looking at my pics again and I have to say that it is FOX NEWS on the TV. Honest.
NRA Life Member
"The beauty of the second amendment is that it will not be needed until they try to take it." -- Thomas Jefferson