Show your DIY Ideas and Projects
Moderator: carlson1
-
- Junior Member
- Posts in topic: 2
- Posts: 13
- Joined: Mon Feb 11, 2013 8:52 pm
- Location: Dallas, TX
Re: Show your DIY Ideas and Projects
I cook at BBQ competitions a few times a year, and I got tired of having to haul a little smoker around. Family get-togethers also put a strain on my little smoker (we have had 50+ people at Memorial and LaborDay parties). So I decided it was time to upgrade... My father helped me some before he passed away last year, and it isn't complete yet, but here is my baby:
Trailer was purchased from a MFG outside Bonham (Tandem 16', 83" wide, with electric brakes), and I had them weld a 500 gallon propane tank onto it. I did everything else.
Has 30 sqft of cooking surface
A double walled firebox with pizza oven insulation between the walls:
I plan on putting a sink, stove stop, and propane grill on the other side of it.
It currently uses 1 stick of wood every 30-45 minutes. It also has the inlets for fans, from my computer controlled BBQGuru. It helps hold the temp where I set it, and lets me know if something is "wrong" by too fast a drop or grow.
Re: Show your DIY Ideas and Projects
Well if we are doing BBQ Pits, this is what my son and I built, kind of got bigger than what we expected it to be once we started to build it. We love to BBQ though.
-
- Senior Member
- Posts in topic: 8
- Posts: 7785
- Joined: Thu Jul 23, 2009 2:23 pm
- Location: Near San Jacinto
Re: Show your DIY Ideas and Projects
Hogie and brentski, Those are awesome builds. Any chance you'll be at the Dallas Elm Fork get together this Saturday?
KAHR PM40/Hoffner IWB and S&W Mod 60/ Galco IWB
NRA Endowment Member, TSRA Life Member,100 Club Life Member,TFC Member
My Faith, My Gun and My Constitution: I cling to all three!
NRA Endowment Member, TSRA Life Member,100 Club Life Member,TFC Member
My Faith, My Gun and My Constitution: I cling to all three!
Re: Show your DIY Ideas and Projects
Not this weekend, turkey season.
-
- Senior Member
- Posts in topic: 8
- Posts: 7785
- Joined: Thu Jul 23, 2009 2:23 pm
- Location: Near San Jacinto
Re: Show your DIY Ideas and Projects
Good Luck. I hope yo get one!brentski wrote:Not this weekend, turkey season.
KAHR PM40/Hoffner IWB and S&W Mod 60/ Galco IWB
NRA Endowment Member, TSRA Life Member,100 Club Life Member,TFC Member
My Faith, My Gun and My Constitution: I cling to all three!
NRA Endowment Member, TSRA Life Member,100 Club Life Member,TFC Member
My Faith, My Gun and My Constitution: I cling to all three!
-
- Junior Member
- Posts in topic: 2
- Posts: 13
- Joined: Mon Feb 11, 2013 8:52 pm
- Location: Dallas, TX
Re: Show your DIY Ideas and Projects
I was already busy this weekend too. Next time I can definitely do it (especially if I can get permission to sit out there all night). I currently have a place to get bbq meats for mass consumption (good for eating, not sure yet for competitions) at about half grocery store prices. But alas, I am going to be in Oak Point & Crossroads all day Saturday/Sunday.
Re: Show your DIY Ideas and Projects
This was a dremel/stipple job I did to my custom 2011 Edge.
Used the dremel for a slight reduction in grip (double stack .40) and to smooth the original checkering.
End result is a super tacky grip.
Used the dremel for a slight reduction in grip (double stack .40) and to smooth the original checkering.
End result is a super tacky grip.
Re: Show your DIY Ideas and Projects
those smokers are freaking awesome. The blue one is just tooo clean!
Used to do bbq comps, but never had a rig like those...nice jobs!!!
-
- Member
- Posts in topic: 1
- Posts: 189
- Joined: Wed Sep 12, 2007 5:25 pm
- Location: Texas
Re: Show your DIY Ideas and Projects
Orange Gun Club allows draw from holster and shoot on the move so I needed some target stands for the 2" x 2" x 4' stakes and 2' square plywood the club provides. I used scrap 2" PVC scrounged from construction site trash bins and purchased some 2" T fittings. The parts are friction fit in case of an "accident" where a replacement part is needed. After 5 years, I have not needed to replace any parts.
-
- Banned
- Posts in topic: 2
- Posts: 946
- Joined: Fri Aug 10, 2007 9:56 pm
- Location: Fort Worth, Texas
Re: Show your DIY Ideas and Projects
The grip wasnt sticky enough...
-
- Senior Member
- Posts in topic: 8
- Posts: 7785
- Joined: Thu Jul 23, 2009 2:23 pm
- Location: Near San Jacinto
Re: Show your DIY Ideas and Projects
Details???
KAHR PM40/Hoffner IWB and S&W Mod 60/ Galco IWB
NRA Endowment Member, TSRA Life Member,100 Club Life Member,TFC Member
My Faith, My Gun and My Constitution: I cling to all three!
NRA Endowment Member, TSRA Life Member,100 Club Life Member,TFC Member
My Faith, My Gun and My Constitution: I cling to all three!
-
- Banned
- Posts in topic: 2
- Posts: 946
- Joined: Fri Aug 10, 2007 9:56 pm
- Location: Fort Worth, Texas
Re: Show your DIY Ideas and Projects
I used a soldering iron to melt the grip of the gun to a basically flat surface then spent a few hours making small dots all over it. I should have taken some photos but didn't think about it.puma guy wrote:Details???
-
- Senior Member
- Posts in topic: 8
- Posts: 7785
- Joined: Thu Jul 23, 2009 2:23 pm
- Location: Near San Jacinto
Re: Show your DIY Ideas and Projects
Looks good! I thought maybe you had removed a layer of the grip surface and replaced it with a faux suede material wrap. I have Apex wrap arounds but they have lost their tackiness.killerfly128 wrote:I used a soldering iron to melt the grip of the gun to a basically flat surface then spent a few hours making small dots all over it. I should have taken some photos but didn't think about it.puma guy wrote:Details???
KAHR PM40/Hoffner IWB and S&W Mod 60/ Galco IWB
NRA Endowment Member, TSRA Life Member,100 Club Life Member,TFC Member
My Faith, My Gun and My Constitution: I cling to all three!
NRA Endowment Member, TSRA Life Member,100 Club Life Member,TFC Member
My Faith, My Gun and My Constitution: I cling to all three!
Re: Show your DIY Ideas and Projects
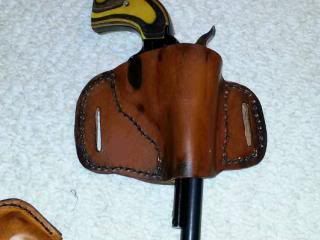
I made a holster for a friend of mine. Leather, thread, needle, dye, shiny water resistant coat, and hand boning tool are all from Tandy Leather company. Cost, not including cost of tools is $51.00: Bullseye Minimal Holster Kit Revolver, Item #44454-01. This is for a friend who cannot afford to buy a proper CCW holster. Her CCW is a .22 WMR single action revolver. It is a $100 gun she bought from Academy. Eco-Flo Gel Antique Dye 8 oz, $9, #2607-04. Eco-Flo Super Shene 4 oz., Item #2610-01, $7.
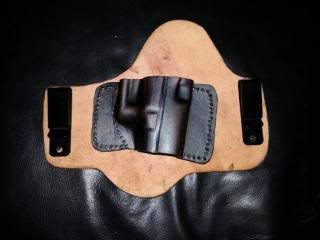
Another holster I made for another friend of mine. He owns a Glock 26 but complains that it is uncomfortable to carry and was considering trading it for a mouse gun. Mouse guns are fine, but he could only afford ONE gun. Friends don't let friends trade their Glock in for a mouse gun. His IWB holster looked very uncomfortable. So, I made a super comfortable IWB holster for him that is even better than the commercially available ones manufactured by a popular holster maker. This popular holster maker used a hard plastic to retain the gun. I used the thickest leather I could find and hand tooled it and compressed it with some moisture so that it dried into a hard shell that snaps the gun in place to retain it. The popular holster maker also uses raw unfinished leather on the side facing your body. This allows the holster to absorb sweat and stink. I hand rubbed dye and many layers of water resistant coating on both the outside (shiny leather side) and inside (felt side) of the holster. The popular holster maker just cuts the leather, making sharp leather edges that could cause sensitive skin discomfort. I hand sanded the leather edges smooth and applied dye and water resistant coating to all leather edges. Kydex holsters also cause pants to wear out after a year or so. Leather will not wear out your pants but it is very difficult and time consuming to use leather instead of Kydex so nobody uses it anymore. IMHO, any savings you got from a Kydex holster over a leather one will be vaporized by your having to replace your pants prematurely. Hard plastic may also wear out some gun finishes faster than leather (Glock's Tennifer finish should hold up equally well with either, though). I also used hand stitching instead of rivets to hold it together even though it is much more time consuming because a small percentage of rivets tend to pop out. I used water resistant thread. This should be a very comfortable IWB holster that'll allow him to carry a Glock. It is so comfortable, that he is now trading his Glock 26 for a Glock 23, which is bigger than a Glock 26.
I bought all the materials from Tandy Leather. Cost is $64, not including cost of tools. The belt clips alone are $8, Item #1240-24.
You won't save any money by making your own holster, but you'll get a better holster and you can customize it. I hand tooled my frineds' names on to their holsters. I just photoshopped out their names because I don't think they'll appreciate having the fact that they have a CHL plastered all over the internet. It is very easy to learn how to make leather holsters. Watch the various Youtube Videos including the ones from Tandy Leather. Tandy Leather also sells holster kits with pre-cut parts and instructctions if you are a beginner. I do not work for Tandy Leather nor do I benefit in any way from them. I am not endorsing them. If I were, I'd tell you their leather holster kits are $35. However, this is NOT the real cost of the holster because you have to buy other stuff such as dyes, shiny finishes, and tools. That's why I listed the cost of the holsters as $51 to $64. This reflects the real cost of the holster if you are just making a few holsters for yourself and some friends.